Step-by-step guide to enable microphone and speech features on Safari, Chrome desktop, and mobile devices.
Daniela Serrano
Design
To use Speakable's speech features, like audio recording and automatic transcription, your device needs permission to access the microphone and, in some cases, speech recognition services.
Note: For the best experience on iPhones and iPads, we recommend downloading the Speakable iOS app. Safari has known limitations with speech recognition.
If you’re using Safari:
1. Allow Microphone Access in Safari
Open Safari and go to the Speakable site.
Tap the “AA” icon in the address bar.
Tap “Website Settings.”
Set Microphone to Allow.
Reload the page.
2. Enable Speech Recognition in iOS Settings
Open the Settings app.
Go to Privacy & Security > Speech Recognition.
Make sure Safari is toggled on.
Return to Safari and test audio features.
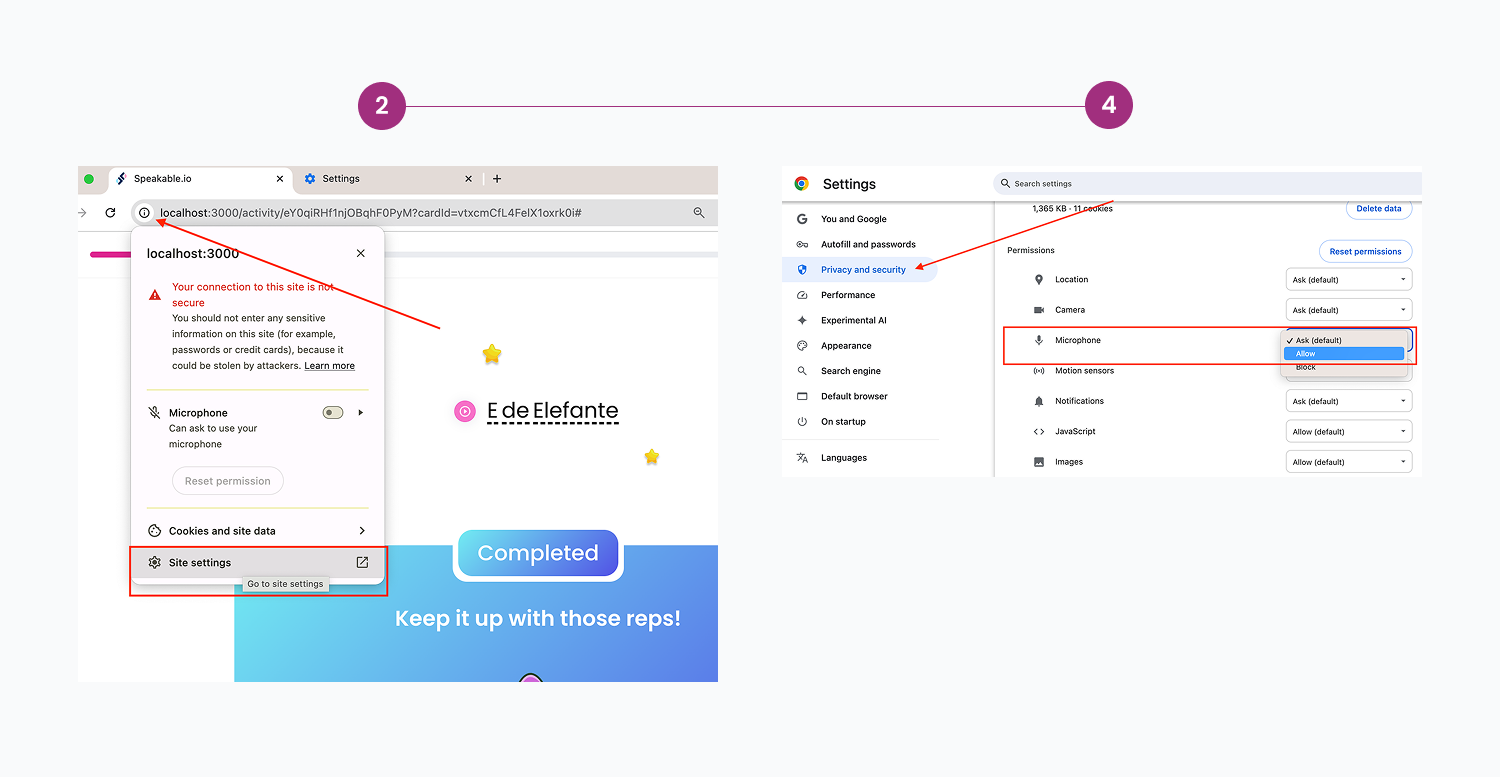
Chrome on Desktop (Windows, macOS, Chromebook)
1. Allow Microphone Access
Open Chrome and go to the Speakable site.
Click the lock icon next to the URL in the address bar.
Click Site Settings.
Set Microphone to Allow.
Close the settings tab and reload the page.
Chrome on Mobile (Android and iOS)
Note for iOS users: Chrome on iPhones and iPads still uses Safari under the hood, and may not fully support speech recognition. For better results, use the Speakable iOS app.
1. Allow Microphone Access in Chrome Mobile
Open Chrome and go to the Speakable site.
Tap the lock icon next to the URL.
Tap Permissions.
Set Microphone to Allow.
Reload the page.
Final Step: Test the Features
After adjusting permissions, return to Speakable and try a speaking activity. If the microphone or speech recognition still doesn’t work:
Double-check your browser and system permissions.
Try closing and reopening your browser.
On iOS, consider switching to the Speakable app for a smoother experience.
Our blog
Latest blog posts
Tool and strategies modern teams need to help their companies grow.
.svg)

.png)
.png)
.png)
.png)

.png)